Seagate Expansion 3TB External HDD – What’s Inside?
The majority of external hard drives are nothing more than a case, a USB-SATA adapter, and a standard 3.5″ or 2.5″ hard drive. Despite having this extra hardware, they sometimes actually cost less than their bare counterparts. Why might this be? External drives usually only carry a 1 year warranty, while the average desktop drive today might get 2 years of coverage.
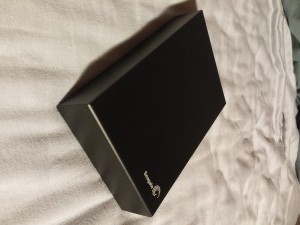
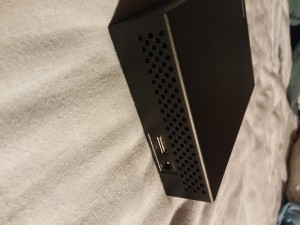
Above is a 3TB Seagate Expansion external hard drive. It has a USB 3.0 interface, and accepts 12VDC for power. I bought this a few years ago for $10 less than a bare 3TB SATA desktop drive.
Western Digital released a line of external hard drives where, when you take it apart, you don’t find a normal drive inside. Instead, the control board is actually a USB interface, not SATA.
Out of curiosity, and because I might put this drive inside my server in the future, I decided to tear it apart to see what I was working with.
3D Printing, Engineering, Germany and more [Life Post]
8 months between posts is possibly a record on this site. That isn’t to say nothing interesting happened during all that time. Here is a quick recap to keep this site going:
Germany
This summer I studied German for 5 weeks in Germany. The entire trip was documented in great detail over here: danjoannis.com/heidelberg
Video Projects
A few videos have come out on my YouTube channel, some technical ones and a more artistic one to play with my new DSLR.
It seems someone made (another) viral video of their 3d printer playing the Imperial March, so here’s my take on it.
3D Printing
I’ve been putting more time into my Ecksbot, and keeping it maintained and improving print quality. I’ve expanded my filament collection thanks to Matt Durr, and been doing some work with original creations.
Ikea Roller Blind Mounts
Last week I uploaded my first public design to Thingiverse – I hope to create and share more projects soon!
Homebrew Stereo Gainclone Amplifier
In 2012, one of my posts were featured on Hackaday, a globally read and frequently updated aggregator of projects that modify, create, and otherwise hack. The traffic this garnered was enough to throw a couple 500 Server errors, but it also resulted in getting the attention of someone at Farnell/Newark.
I was contacted through the comments by a member of the Farnell team, who spent quite some time on my site and was “loving the content”. After further communications, he asked if I would be interested in reviewing products for them. Of course I said yes!
The question was, what would I review? After looking through some of their enormous catalog, I realized I’d rather create something out of the components I reviewed, and discovered the LM3886, a relatively inexpensive 68-watt audio amplifier. This is where the adventure began!
Hacking a Laptop Battery – Increase Runtime
Do you have an old laptop whose battery struggles to reach 30 minutes? I used to.
An aftermarket 6-cell pack would have cost me around $40, which isn’t expensive, but the laptop was old (circa 2006) and not worth putting money into. I happened to have a fair number of Lithium-Ion battery cells “lying around”, and decided to upgrade my pack, not just with new cells, but with more cells.
This project was completed about a year ago, and I’m surprised I never posted it before!
Creating a Private + Guest WiFi Access Point (DD-WRT)

Recently I was asked to configure a WiFi access point for a small business, who needed to have both a private internal network, and a public guest network.
There are many privacy concerns when having guests share your network. Specifically, it is desirable to:
- Disallow access to any computers on the private network
- Prevent network abuse (such as P2P file sharing)
- Secure the access point itself from tampering or unauthorized access
Of course, all this needs to be done without impacting the desired service: Internet access.
Although I found many guides online for setting up a guest network when the access point was also the primary router, I didn’t find any that worked for the intended network. So, after some trial, error, and research, I managed to get it to work.
Bell Aliant FibreOP with a DD-WRT Router
This has been a long time coming. To summarize, Bell Aliant’s FibreOP Internet service includes a wireless router that has proprietary, limited firmware. It tends to suffer from latency and WiFi issues. So, I sought to replace it with my own wireless router! I ended up first building an overpowered but very functional pfSense Linux Firewall/Router.
Despite my monstrous UPS, I was not happy with the 1 hour run-time. The whole reason for the pfSense router was that FibreOP “hides” its Internet on a VLAN, which means a standard, consumer router will not be able to access the Internet. And from some forum posts I had read, it seemed DD-WRT was also incapable of it.
Finally, today, I pushed through and realized it takes only 4 simple steps to connect a DD-WRT router directly to the FibreOP modem.
Making Bell FibreOP Work With a pfSense Router
Atlantic Canada is very fortunate to have access to Bell Aliant FibreOP Internet. It is a legitimate Fibre-to-the-Home (FTTH) service, in the same price range as cable and DSL offerings. Speeds start at 50/30 (download/upload in Mbps) for $70/month without any promotions.
As great as the Internet itself is, the wireless router they include is the bottleneck. It is an Actiontec R1000H. Our biggest headaches with it were low WiFi throughput and frequent WiFi drop, but the interface was a little lacking in advanced features.
The logical solution is to use another router. Unfortunately, Bell has configured the service in a way that simply swapping in a new router will not work at all!
Through some research and my own trial and error, I was able to install pfSense to a spare computer, and take control of my Internet.
Disclaimer: Do not follow these steps if you have Bell’s IPTV service, as it will no longer work. There are other sites that describe how to keep those services working, but mine does not. As well, though there should be no impact, I advise against doing this if you have FiberOP Home Phone and rely on it for emergency communications.
This is not an easy task. It requires a very good understanding of computer networking, basic understanding of Linux networking terminology, and availability of network equipment (switches, wireless access points, cables, NICs). Chances are you found this page because you meet some of that description. Just know that if it isn’t working out, you can plug in the Actiontec and pretend it never happened.
Rhythmind – Now Free!
Rhythmind was released a little over 3 months ago. I’ve decided to provide it free of charge, though of course you can still pay what you want for it.
Download it today from Bandcamp.
Repairing a Projector with Tinted and Washed-Out Display
My employer came to me with a little project. The office projector stopped working properly after someone touched the pins of the VGA video cable, and presumably released ESD energy into the projector. The picture’s colours were all tinted and washed out!
Note that the bottom monitor is displaying the same colour pattern
as the projector. Grey is completely missing!
He asked me if I’d like to take a look at it. My answer, as would be expected, was “of course!”
Adding Magnet Feature to a Bally Centaur
 Bally’s Centaur pinball machine came from the factory with an electromagnet, installed in the top-right corner of the playfield. It would hold the ball in place after it hit the “release” target, which initiates the multi-ball mode.
Unfortunately, as time passed and these electromagnets burnt out, it became more difficult and expensive to find a replacement magnet. Most games no longer have the magnet installed, as it was likely removed to be sold.
On our machine, we had no idea if the magnet was still there, and one day decided to look under the playfield to see if there was one. It turns out there was, but it didn’t work.
After verifying the electrical side was fine, we took out the magnet to find that a screw had gone through the playfield, and through the coil!


The price of a replacement electromagnet is upwards of $100! Thus, we decided we would remove the old coil wire and wrap our own. After all, how hard could it be?


