Creating a Private + Guest WiFi Access Point (DD-WRT)

Recently I was asked to configure a WiFi access point for a small business, who needed to have both a private internal network, and a public guest network.
There are many privacy concerns when having guests share your network. Specifically, it is desirable to:
- Disallow access to any computers on the private network
- Prevent network abuse (such as P2P file sharing)
- Secure the access point itself from tampering or unauthorized access
Of course, all this needs to be done without impacting the desired service: Internet access.
Although I found many guides online for setting up a guest network when the access point was also the primary router, I didn’t find any that worked for the intended network. So, after some trial, error, and research, I managed to get it to work.
Network Topology
The following is a description of the desired network.
Private LAN: 192.168.1.x (DHCP already provided for private addresses, Internet source)
Guest WLAN: 192.168.10.x (separate DHCP server, isolated from Private LAN)
Wireless SSIDs:
Private_WiFi (in this example, Internal)
Guest_WiFi (in this example, Guest)
There is already a wireless home router installed, sharing Internet access with the private network.
We want to do two things:
- Bridge Private_WiFi to the private network
- Share only the Internet connection from the private network to the Guest_WiFi.
Let’s move on to the requirements.
Requirements
This task requires you to have a fresh, default installation of DD-WRT on any compatible router.
![]()
The installation of DD-WRT is beyond the scope of this article. I encourage you to consult the DD-WRT Wiki to identify compatible devices and their installation procedures.
This article describes the process for integrating private + guest WiFi Access Points into an existing private network. If you are seeking to add a guest network to your existing router, or if you are looking for a dedicated guest AP, this is not the solution. It may help you, but continue Googling, and I am certain you will find the guide you need.
1. Prepare the router
Connect your computer directly to the router. Open your web browser, and navigate to http://192.168.1.1.
Since this is a fresh installation, you will need to set your administration username and password. Make it secure!
2. Create and secure WiFi access points
Now, begin by preparing your wireless networks.
SSIDs
In Wireless -> Basic Settings, enter the desired name and channel for your private SSID. Click ![]() .
.
Next, click Add, at the bottom, to add a Virtual Access Point (VAP). Enter the name for your guest SSID, and click ![]() again.
again.
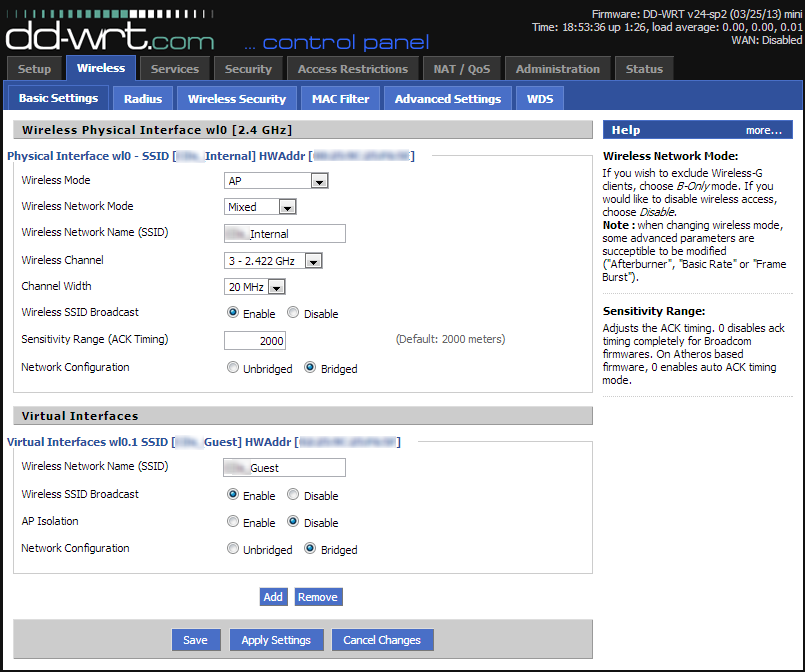
Multiple SSIDs can be broadcast from the same AP. The only limitation is that they must be broadcast on the same channel, if you only have one wireless radio. This impacts performance slightly.
Security
In Wireless -> Wireless Security, type in the password(s) you would like for the private and guest networks. Click ![]() .
.
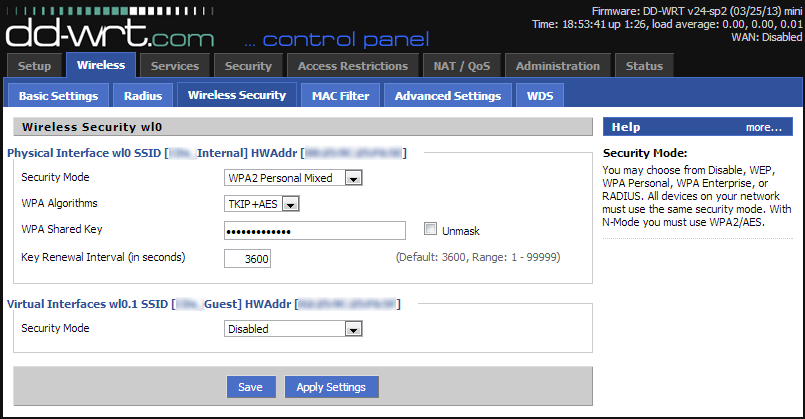
Although traditionally guest networks have no password, this means that all traffic on the guest network is unencrypted, and easily captured. It is best to create a password that you share, so that your users’ data is secure.
3. Begin isolating the guest network
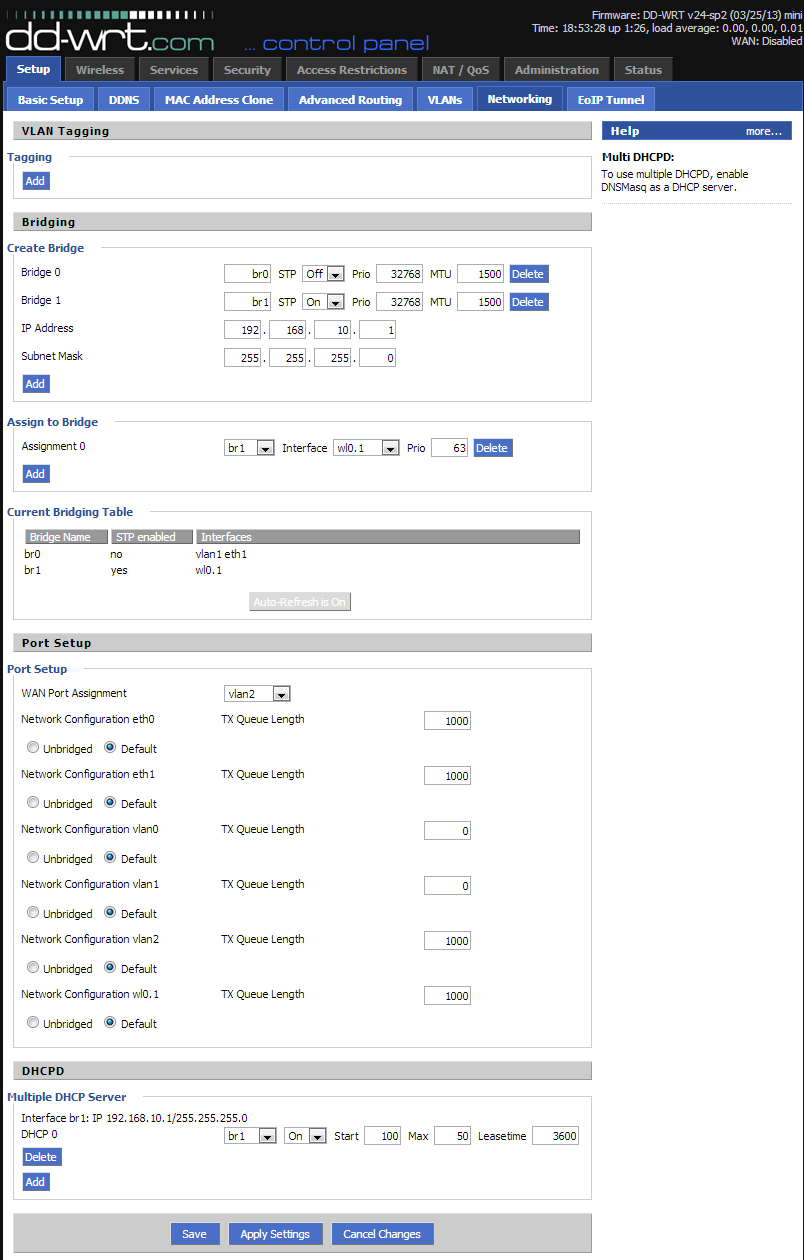
In Setup -> Networking, we will be doing a number of things to separate the guest WLAN from the private one.
- Under Create Bridge, click Add. Note br0 is already there. Do not change its settings!
- Give the new bridge a name, such as br1. The rest of the settings are fine as they are. Click
 .
. - After it refreshes, you will notice two boxes, for Network Address and Subnet Mask. Enter the desired IP address range for the new guest network. In this example, we use 192.168.10.1. Click .
- Next, we must add out guest WLAN to this bridge. Because the guest WLAN is a Virtual AP, it is named wl0.1. So, under the Assign to Bridge section, click Add, and select br1 as the bridge, and wl0.1 as the interface. Click .
- Now, onto the last step for this page. At the very bottom, there is a section called Multiple DHCP Server. In order to give IP addresses to the guest clients, we need to create another server instance.
- In this section, click Add, and select br1. By default, it will give out up to 50 IP addresses. Finally, click .
The final step for getting DHCP working is on another page. Navigate to the Services tab, add the following to the DNSmasq section, and ![]() :
:
# Enables DHCP on br1
interface=br1
# Set the default gateway for br1 clients
dhcp-option=br1,3,192.168.10.1
# Set the DHCP range and default lease time of 24 hours for br1 clients
dhcp-range=br1,192.168.10.100,192.168.10.150,255.255.255.0,24h

The reason for this is because we will be disabling the normal DHCP server in our last step, in order to incorporate the Access Point into our private network. Thus we need to configure DNSmasq as the server for the guest network.
4. Firewall Rules
At this point, we have both private and guest wireless networks. The guest network is still not fully isolated from the private network, and doesn’t have Internet access.
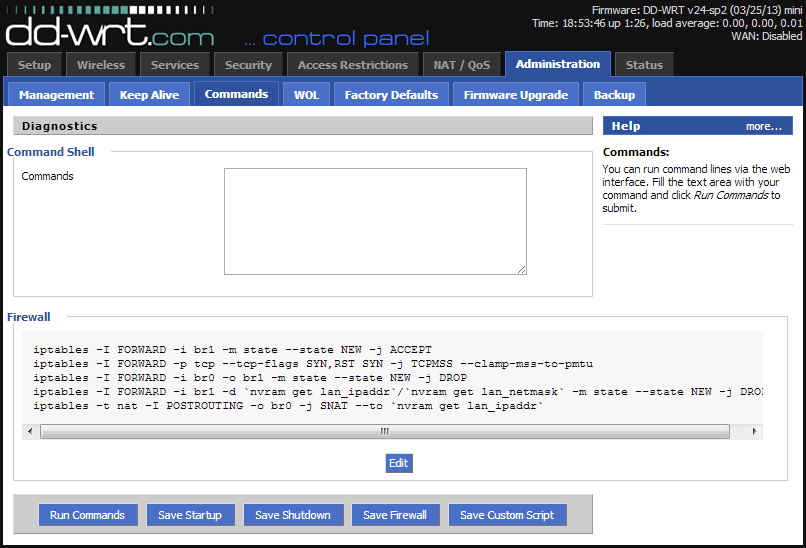
To fix these points, and also add some security, go to the Administration -> Commands page, and copy and paste the following in the Command Shell:
#Allow guest bridge access to Internet
 iptables -I FORWARD -i br1 -m state --state NEW -j ACCEPT
 iptables -I FORWARD -p tcp --tcp-flags SYN,RST SYN -j TCPMSS --clamp-mss-to-pmtu
#Block access between private and guest
 iptables -I FORWARD -i br0 -o br1 -m state --state NEW -j DROP
 iptables -I FORWARD -i br1 -d `nvram get lan_ipaddr`/`nvram get lan_netmask` -m state --state NEW -j DROP
#NAT to make Internet work
 iptables -t nat -I POSTROUTING -o br0 -j SNAT --to `nvram get lan_ipaddr`
#Block torrent and p2p
 iptables -I FORWARD -p tcp -s 192.168.10.0/24 -m connlimit --connlimit-above 50 -j DROP
 iptables -I FORWARD -p ! tcp -s 192.168.10.0/24 -m connlimit --connlimit-above 25 -j DROP
#Block guest access to router services
 iptables -I INPUT -i br1 -p tcp --dport telnet -j REJECT --reject-with tcp-reset
 iptables -I INPUT -i br1 -p tcp --dport ssh -j REJECT --reject-with tcp-reset
 iptables -I INPUT -i br1 -p tcp --dport www -j REJECT --reject-with tcp-reset
 iptables -I INPUT -i br1 -p tcp --dport https -j REJECT --reject-with tcp-reset
Note: Some people have reported issues with the #Block torrent and p2p section. The limit may be too low to load modern sites, sometimes making the guest network unusable. I would recommend leaving this out unless you want to be really restrictive.
Finally, click “Save Firewall”.
Do not be tempted to change the quotes around the nvram commands. It works exactly as is.
The section for blocking P2P works by throttling the maximum number of connections made by a client. P2P services make many connections, which significant impact network performance. So for TCP connections, it limits clients to 50, and for UDP they are limited to 25.
Blocking router services on the guest side is a good security idea. In this example, it prevents telnet, ssh, www and https access to the router.
5. Adding it to the private network
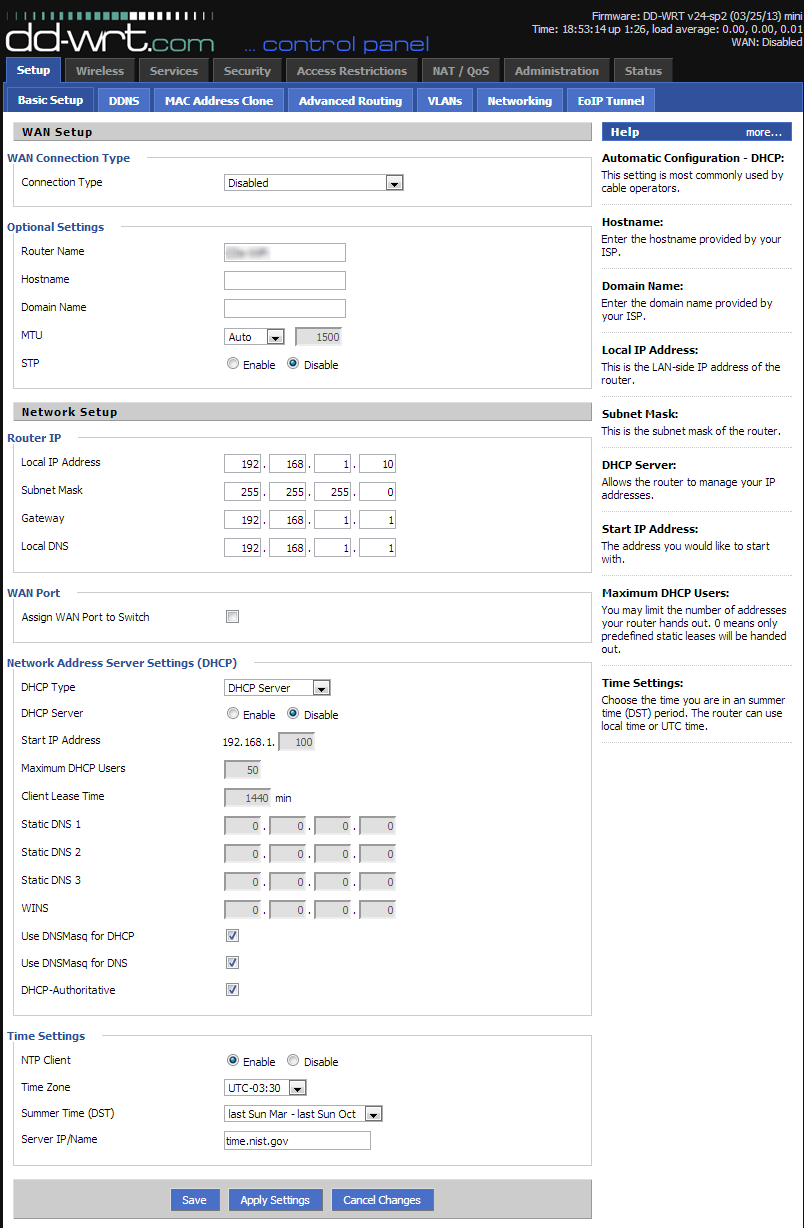
We are almost done! All that is left is to include it in the private network. To begin, click the Setup tab.
The following steps all need to be done in sequence. Do not click Apply Settings until the very end!
- Disable the WAN connection, by setting the WAN Connection Type to Disabled.
- Change the Router IP address to something that is a) in your private subnet, b) not already being used. For example, if you existing router is 192.168.1.1, change this to 192.168.1.2.
- Set the Gateway and Local DNS settings to the IP address of your existing router (ie. 192.168.1.1).
- Toggle the DHCP server from Enabled to Disabled.
- If you want the router to keep time, enter the NTP settings.
6. Making the connections
Now that all these settings are in place, you can reconnect your computer to your existing network. Alternatively, you can leave it connected to this router, as the wired connections will still be in the private network.
Connect any of the remaining LAN ports of this guest router to your existing network. The Internet port is disabled in this configuration.
Your computer should now be on your private network. Now you can begin testing by connecting a wireless client to the guest network, verifying Internet access, and ensuring it cannot communicate with any of the private computers.
Resources!
The DD-WRT Wiki is very helpful. Here is the specific page that helped me get it all working (note the “for WAPs – WAN port disabled” commands.)
Also, How-To Geek had great information for the DNSmasq settings, and for blocking guest access to router services.
Thanks for the instructions.
The iptables commands cannot be copied and pasted though — because the double minus options (like –state NEW) have been changed to – (dash) by WordPress.
Thanks for pointing that out – should be fixed now!
Finally! This is the only tutorial that has worked for me. I own a Buffalo WHR-300HP router functioning as an access point. I’ve made several attempts to separate the WLANS using DD-WRT’s firmware and Buffalo’s professional (branded DD-WRT)software. I was never able to get it to function properly, even after spending hours going over various forums and trying other tutorials I’ve found elsewhere.
My first attempt here was with the DD-WRT firmware for the WHR-HP-G300N (there’s no official support for the WHR-300HP, but it’s is nearly identical to the 300HP), everything worked immediately, except for video streaming. On a hunch, I eliminated the firewall script lines for
blocking p2p & torrents-video problem solved. I DID however want
those features in place, so I elected to go through the bother of going back to Buffalo’s Pro software to see if this tutorial would work with it. It did, and perfectly! No more problems with YouTube and other video sites.
Thanks very much!
Thank you so much. You are the bestest !!!!
I have been looking for instructions on how to replace my default sky router with a different one that runs dd-wrt for the sole reason to set a guest wifi network working separate from my private network, found all kind of guides and solutions, eventually it kind of worked, but then I ran into the problem of linking and port forwarding all my ip cameras and NAS in the new router … nightmare … and now your solution is exactly what I need … i don’t have to replace my sky router, but I can achieve the separate networks linking the new router behind the sky one and completely block the access to whatever is linked to the sky router … i spent so much time reading the forums and instructions and i was at my witts end, so close to dropping my whole project … i can’t thank you enough
I wonder if I can achieve a bit more on your setup. I hope I am not too greedy now that I got things to work 🙂
Is it possible to link just one of the remaining LAN ports of the “guest” router (running dd-wrt) with the guest wifi network so that the respective LAN port does not have access to my private network, but get Internet access? I am thinking to use a powerline range extender for the guest wifi to plug in such a LAN port, or plugging a hub with several LAN ports for guests who prefer to wire-link their laptops rather than wifi connect. Regards
It would depend on your hardware (router model) and how your network is configured. If your network is identical/very similar to the one I describe in the article, it shouldn’t be too hard to do!
Note that the WAN port is disabled in my configuration. On this router the WAN port was eth0. What you could do is add eth0 to the guest bridge, which would give you a single Ethernet port (the Internet/WAN port) as a guest Ethernet, while the remaining LAN ports (eth1) would continue to be private + uplink.
Note that I tried in vain to get this working on an Atheros based router. Apparently the VLAN configuration on this chipset does not work properly and causes plenty of grief when you try and assign the LAN ports to the guest network. Eager to get this working prior to a looming deadline, I let the Lord lead me to attempting this on a Broadcom chipset based router and it worked very smoothly as I just needed to assign the various LAN ports to the appropriate VLAN that I would then associate with the bridge. Good luck!
The #5 FORWARD rule (line #2) is syntactically incorrect (‘ SYN ‘) and rejected by the shell. Furthermore, removing the extraneous non-option is futile because the command is not executed (r23598) possibly due to code removed from iptables by dd-wrt.
In addition, the #6 FORWARD rule (line #1) is superfluous because ACCEPT is the default policy for the FORWARD chain.
Err, the syntax (‘SYN,RST SYN ‘)for the #5 FORWARD rule (line #2) is correct in the context of a serial console, not from the CLI (shell) without apostrophes.
Savings of nvram can be had by consolidation of:
iptables -I INPUT -i br1 -p tcp –dport telnet -j REJECT –reject-with tcp-reset
iptables -I INPUT -i br1 -p tcp –dport ssh -j REJECT –reject-with tcp-reset
iptables -I INPUT -i br1 -p tcp –dport www -j REJECT –reject-with tcp-reset
iptables -I INPUT -i br1 -p tcp –dport https -j REJECT –reject-with tcp-reset
…to:
iptables -I INPUT -i br1 -p tcp -match multiport –dports telnet,ssh,www,https -j REJECT –reject-with tcp-reset
N.B. using REJECT confirms that the firewall is protecting the resource. Consider DROPping the packets.
Thanks heaps, Dan. I had tried a couple of other guides but yours was the one that worked on my WR841ND. I now have a cheap AP with a guest account that really works as it should.
Cheers and best wishes.
This is great to hear, I’m very happy I could help you get setup!
Thank you for this guide.
There is a way to limit guest bandwidth?
Bye
Dave
Nice tutorial.
Can this be set up on more than one access point on the private lan to extend the range? If so any changes necessary on second access point?
If I understand correctly, you’re looking to have two access points, which each provide both a private and guest SSID? In that case, I would expect the configuration to be identical. As always, ensure you use different channels for each router, and also make sure STP is enabled to prevent routing issues when a device switches APs.
I’m trying to set up a guest network using the instructions above. It is working with one exception which I am not able to figure out and am hoping you have an idea why. First I’ll describe the setup.
I have an ASUS RT-N56U as my primary router connected to the ISP, it has a IP of 192.168.1.251. Next is a Linksys E3000, IP 192.168.1.252. It is connected to to the ASUS using a LAN port on both the E3K and Asus ends.
The E3K is the DHCP server for both the private (192.168.1.x) & guest (192.168.2.x) networks.
One box on my private network is a server (192.168.1.1), it is wired directly to the ASUS router and the ASUS is setup to do port forwarding of various ports to it.
When I add in the iptables rules listed in your blog above the forwarded ports all seems to be blocked when accessing the server from outside my network.
Any help will be very much appreciated.
I should have mentioned, the E3K is where I have the guest network setup as shown above, it is running DD-WRT V24-SP2 (04/13/11) Big.
Thank you very much!
I followed your directions precisely and found that devices attempting to connect to the guest network were unable to get an IP via DHCP.
If I re-enable the DHCP server that was disabled during step 5.4 everything works correctly, that is to say devices connecting to the guest network get a DHCP assigned IP on the 192.168.10.x network.
Any ideas on what might be wrong?
Anyway, thanks for the great guide.
I had a typo… Fixed it and all is working well!
Thanks again for the wonderful instructions.
Hi Shane,
I’m glad you got it sorted out 😉
Here is a little clarification I wrote up before I saw you got it working. This guide assumes that there is another primary router providing DHCP addressing for private clients. In order to prevent conflicts on the private side, Step 5.4 disables the default DHCP server on the private side.
Step 3.3 is the first step to enabling a separate DHCP server for the guest network. As well, the very last (unnumbered) part of Step 3 is what configures the DHCP server for the guest clients. And yes, typos will bring many systems to their knees!
Cheers,
Dan
Hi, I just done everything exactly as is in this tutorial and have the similar problem, but no DHCP server on public network. On private network I switched to DHCP forward to my DHCP server and private network is fine, but public network is useless without static IP on client. What to do?
And private network is HW VPN with multiple subnets eg. 192.168.100.x is the main network which is unreachable from public network, but others eg. 192.168.101.x are fully reachable. I want to disable everything which is 192.168.x.x from public network.
Please help. 🙂
And another problem… there is no DNS server in public network. So I must set static IP + DNS server on clients to get it working with Internet.
Looking at step 5 from a distance it looks like HE is ADDING the router/switch to an existing network by way of the 4 port switch. This explains the wan disable. In the mode the Extra AP “this project” runs separate from the main network /whatever it is.
In my observation this is a way to extend a private network that is already working on it’s own settings that remain the same.
Pretty awesome.
I have been playing with this for weeks and have 3 wrt54g’s v7 v8 v8 and this has been fun. The wiki on ddwrt didn’t work.
however it does work, I just had to go real slow. And reflash the routers on a slower eithernet connection.
Chow Chihuahuas
Seems like no matter what I try I can connect to the guest network but unable to connect to the internet. Not sure what the problem could be here. I tried different configurations to no avail. The way I’m able to connect to the internet is to not assign the guest network to bridge br1 using wl0.1. Any ideas what the problem could be?
I am having the same issues as the last poster.
Private WiFi connects and internet access works/local network shares.
Guest WiFi connects fine, can’t access local shares(as desired) but internet doesn’t work.
Followed steps precisely.
Maybe try skipping these two components and seeing if the results vary:
#Block torrent and p2p
#Block guest access to router services
Just remove those two sections and see what difference it makes. The first section limits the number of simultaneous connections allowed, and the second section is supposed to block access to the router itself.
The system I have setup does occasionally have guest internet access issues for some people, but my own devices all work fine on the guest network.
Try removing those and let me know!
Confirmed that removing the torrent/p2p/router services blocks enables guest access to work on my dd-wrt V24-sp2 router. This is now no worse than before when I had guest access on the router running through the WAN port with a firewall rule to block access to the private network on the WAN. Will configure dd-wrt to block unauthenticated access to the status page and be satisfied with the results. Thanks for this excellent article!
Awesome! Perfect instructions. Thank you so much!!
Thank you for clear and concise post, finally got my guest wifi configured properly and don’t have to worry about guests trying to get into my LAN devices.
Odd, On a Asus Rt-AC68u , with this suggested setup,
the WAN port seems to function as part of the LAN with the exception that the wireless clients cant get to the management page even if on the private SSID. is that normal? is it worth using “Assign WAN Port to Switch” which didn’t seem to do anything.
super Helpful! But is there a way to setup a guest network that only has access to wikipedia,waze, and google maps ?
He there!
Thanks for the tutorial. So far everything fine but the Firewall settings break my 5Ghz WLAN. I’ve testes it several times now – it is definately the “iptables -t nat -I POSTROUTING -o br0 -j SNAT –to `nvram get lan_ipaddr`” that makes my wl1 unavailable.
As soon as I comment that line, wl1 is back again. Any ideas?
I suspect the issue lies with how the 5GHz interface (wl1) is treated. Very likely, the 5GHz interface is recognized separately from the 2.4GHz interface (wl0, perhaps?).
Have you tried adding wl1 to the bridge, br0? If it is not included in the bridge, than traffic will likely be discarded for the wl1 interface.
Thanks alot for your reply! Actually right now it looks like everything is working fine. I’ve bridged eth0 to br0.
Actually… adding the etho0 made a huge mess 😉 I just disabled the SPI firewall.. seems to work now. Weird though because SPI Firewall wasn’t a problem before.
THANK YOU!!! I was having a very difficult time trying to accomplish exactly this!
YOU ROCK!
Thanks a lot, you did a great job with this article !
I still wonder though ; would it be possible to use the WAN port as the interface connecting the private network in order to be able to use Guest WIFI plus LAN ports in the Guest network ?
Anyway, thanks again !!
Yannick
I’m sure you could, you just need to make sure your firewall rules and bridges are setup properly!
I see, but how can I declare WAN port as being “lan” and LAN ports to use the same settings than the WIFI guest (dhcp, firewall rules, etc…) ?
You create two bridges, br0 and br1. Br0 is private, and br1 is guest. If you assign the WAN port to br0, and all the LAN ports to br1, then the WAN will be private and the LAN will be guest.
Alright, I’m gonna try this and see ; thanks very much for your help !
hi there – this is a very good post. however im facing a problem currently.
we run a netgear r6300 v2 and our main router is a linksys wrt1900ac. they both have dual band.
1. configured 2.4gh and 5ghz repeater mode on netgear – works
2.done the above for have a “guest” account, however just like the suggested above, we cannot get internet access. we are able to connect but no INTERNET connection.
could you assist please?
Paul
I suspect that these routers have multiple wireless interfaces (ie. wl0, wl1, etc). When you are creating your bridges for Private/Guest networks, you need to ensure the right interfaces (and virtual interfaces) are being mapped.
The interface names in my tutorial can only be guaranteed for the router I used. For others, you will need to identify the interface names specific to your model. The concepts I describe should remain the same – only the interfaces change.
What does this affect?
– Bridges
– Firewall rules
Just wanted to say thanks for doing this research and posting it.
hi dan,
thanks, but so far all seems correct regards labelling (naming). can i send you screenshots somehow?
thank you
I had exactly the problem you described here and followed your instructions word by word but I always had the same problem. Every Wifi device worked flawlessly but none of the LAN ports on my TP-Link 841nd worked anymore. I spent 3 hours looking for the part where I did something wrong. Go figure, I didn’t! The Brainslayer DD-WRT Image has this exact problem for 3 years now!
http://www.dd-wrt.com/phpBB2/viewtopic.php?t=152738
You can fix this by going to the DD-WRT GUI -> Administration -> Commands and enter:
swconfig dev eth0 set enable_vlan 1
swconfig dev eth0 set apply
then click Save Startup for not loosing this on reboot.
On my 841nd V9 it is eth0, there are other versions where the switch is on eth1. You have to try this for yourself!
It works now like a charm!
Hi i was wondering if someone can help me its driving me mad…
I have r7000 built DD-WRT v24-sp2 (06/13/14) kongac as an access point connected to another ddwrt netgear managing the dhcp. I followed all the instructions above But i cant get internet on my guest network. I get internet on the main wifi. But not on the br1
The ethernet is connected to lan port 1 on the r7000
Thank you
Hello,
Thanks for the guide. I have been looking this guide for long time. I was able to setup everything on GUI but couldn’t figure out the command line part until saw this guide. Thanks!
I have question. I have exact scenario that you have except the secondary WAP is running on tomato. I know tomato and dd-wrt is different but they are using similar concept and philosophy. Both running on Linux and gui configurable. Again, I was able to create guest network separate from my internal network. I can connect to guest network but no internet.
On the interface perspective, I used br1 as guest network and br0 as internal network (exactly same scenario that you demonstrated). I have applied the command line part which are
iptables -I FORWARD -i br1 -m state –state NEW -j ACCEPT
iptables -I FORWARD -p tcp –tcp-flags SYN,RST SYN -j TCPMSS –clamp-mss-to-pmtu
iptables -I FORWARD -i br0 -o br1 -m state –state NEW -j DROP
iptables -I FORWARD -i br1 -d `nvram get lan_ipaddr`/`nvram get lan_netmask` -m state –state NEW -j DROP
iptables -t nat -I POSTROUTING -o br0 -j SNAT –to `nvram get lan_ipaddr`
iptables -I INPUT -i br1 -p tcp –dport telnet -j REJECT –reject-with tcp-reset
iptables -I INPUT -i br1 -p tcp –dport ssh -j REJECT –reject-with tcp-reset
iptables -I INPUT -i br1 -p tcp –dport www -j REJECT –reject-with tcp-reset
iptables -I INPUT -i br1 -p tcp –dport https -j REJECT –reject-with tcp-reset
but still doesn’t let guest network to access internet. Can you help me on this?
Thank you so much,
Really appreciated.
This guide is great!!!
Is there a way to limit the guest AP bandwidth?
Thank you very much,works great
Thanks for the instructions. The DHCP part was especially helpfull!
Kudo’s !!
I have connected a unknown WiFi network and i don’t have any access to router.i can’t reach other person of the network but many people have connected one same SSID and ip also same subnet. Now how can i understand it’s clients isolation is enabled.that means is there any way to understand to see the network or any other script that can tell me it’s a isolated network?
If this is a public WiFi or guest network, chances are good isolation is turned off. This is to prevent unintentional file sharing, and also to mitigate malicious transmissions between network devices.
Without knowing the configuration of the network, you can only make a reasonable assumption that isolation is enabled based on your observations. If you have two clients whose IPs you know, try to connect directly to a service from one to another. You could try to ping the other client’s IP, for example, if they weren’t ignoring ping requests.
May someone tell me what the bridge does in this example?
I thought bridges are done between two devices?
Thanks!
Bridges can also be done between interfaces. In this case, it bridges the wireless and lan interfaces.
Thank you, that’s a precise answer. Do both sides of a bridge HAVE to be in a different subnet (I guess it should) or may f.i. both be in 192.168.1.xxx?
My point is, can you do the above tutorial having the private and guest network in the same subnet but configure the firewall to only let the guest wifi communicate with defined ip adresses, such as the gateway?
You might need to experiment with that. My concern is whether DHCP would work properly with two isolated interfaces in the same subnet. I’m not overly well versed in iptables to know how this would behave without experimentation.
Hello,
Great post and thank you very much for your time in doing so. I know how laborious it can be to describe things in words.
I am trying to achieve a similar set up to you, but instead of setting up a guest network on an access point. I would like to set it up on the main router (Linksys WRT610N V2) which I have flashed with DD WRT and is connected to a BT modem. I then have 3 x AP which have DHCP disabled on all and in different subnets so main router 192.168.1.1, AP1 192.168.1.2 and so on. They all share the same SSID and have the same password.
So my question is how would I set this up, if even possible to have a guest wireless network?
Thanks again for all the great information on here guys. I find it so hard to find the correct knowledge, but once found it can easily be applied.
Hi Gavin,
You should be able to set that up with only minor variations in the configuration. In Step 5, we configure the access point to integrate into an existing network. Doing so, we disable the WAN interface, and statically configure the network configuration. In your scenario, you would simply need to “skip” this step, and instead substitute your own WAN configuration.
Note that there are no physical interfaces tied into the guest network, only a virtual WiFi access point. You will need to tweak your bridge configuration and firewall rules accordingly if you needed your remote APs to also have access to the same guest network. Of course, you could configure independent, isolated guest networks on each AP.
Hope that helps!
Dan
Hi Dan,
Thank you for your reply!
Now I know it can work I will supply you with a few more requirements to see if they also are possible.
Following on from my set up listed in my previous post. I should mention that the access points are Cat5e wired to the main router. The main router and 2 of the access points I would like to show the guest SSID and just one of the access points to show the private network SSID. The private access point also will have 2 computers wire connected to it.
Is this set up possible and how would I implement it?
I am new to DD WRT as you may have guessed and networking is not something I do by trade, so excuse my lack of knowledge.
Thanks again for information and your time.
Soon I’ll have to start charging a consultancy fee 😉
The complexity of the system hinges on one design assumption: that you don’t need your guests to be able to talk to one another. No file sharing, no LAN games, purely internet access. This is because most routers do not have enough separate physical interfaces to allow the existence of both common private and guest networks.
The following design makes the assumption guests only need internet access.
1 – Main Router
Configure this router as in my previous comment. It will be the WAN and DHCP source for the private network, and will also have a guest access point.
2 – The 2x APs with guest WiFi (only WiFi for guests)
Configure both of these as described in the how-to article above. The private network will be the exact same as the one from the main router, but the guest networks will be different and won’t communicate locally.
3 – The 1x AP for private only
Configure it as you would before, just a normal, simple WiFi AP with DHCP disabled. All physical LAN ports will be private, and the WiFi will be as well.
There is plenty of room for things to go wrong, and it will take time to get it right. Draw yourself a nice network map and organize which routers will receive which configuration. That way the roll-out will be smoother.
Good luck!
Dan,
Thanks for the write up. I think I have done everything as described, but I cannot get the Guest SSID to broadcast. I am using a WRT54G ver 2 router.
Thanks for your help.
I tried signing into Guest (even though it is not broadcasting) and the Guest network cannot be found.
[…] http://blog.danjoannis.com/?p=1362 […]
Awesome and very useful info here,
thank you very much !
This worked great, thank you so much!
It took me several tries to get this…
I had internet access on main SSID right away but had trouble with the guest one until I realized your guest IP (192.168.10.1) is in your scripts so I as soon as I changed my guest IP to yours it worked immediately! I guess I learned you have to follow the directions exactly! 🙂
Now I can setup my church with several AP’s running the staff SSID and a guest one too!
Hi Allan, I hope you didn’t get stuck for too long over the IP issue. As long as you are consistent throughout, you can of course use any subnet you wish!
Dan
Hi Dan,
Excellent post….although I had to add DNS into DNSmasq option to get guest internet working. Apart from it, everything was carefully written. Thanks for your instruction.
What DNS exactly did you add, I’m having this same issue.
Thank you greatly if you have time to respond.
Avery
#DNSMasq entries for setting up DNS server when guest network is not connting to internet.
dhcp-option=br1,6, 209.244.0.3,209.244.0.4
# I used the following website to get the DNS server addresses. Pick the one that you like and replace them in the above command
#http://pcsupport.about.com/od/tipstricks/a/free-public-dns-servers.htm
I
Sorry Avery, I just saw your msg.
Although it’s too late, following did work for me. If this won’t work add your ISPs DNS.
dhcp-option=br1,6,8.8.8.8,8.8.4.4
Same here, private ap works. guest ap works. Even windows says it has internet, but when navigating, no website possible. Most likely dns problem. What has been added in DNS masq for DNS?
Tnx
I am so excited to try this out considering most of the comments here are positive. I currently use Cucumber Wifi for one of my restaurant. They’re great if you are looking for a wifi solution for your business particularly guest wifi and cloud management.
Thanks for this great article though Dan. I will let you know how it goes.
Hello,
do you know if it’s possible to deactivate only one of the WLans in the night?
The function of the radio time restrictions deactivate both Wlan.
Many Thanks!
I was following along just fine, until step (5) where we were to disable the WAN connection, etc. I have an Asus (DD-WRT) router that I use for a VPN, which connects thru my ISP modem. Everything goes thru the Asus, nothing goes thru the modem directly.
The modem gives a single IP (for my Asus router) and the Asus uses the WAN Connection Type ‘Static IP” with all the IP/Gateway/DNS addresses for the VPN service, etc. It all works fine, and setting a guest network in steps 1 & 2 gives access to users–though it’s not isolated as in steps 3 and on.
The problem is: I’m not sure I can disable the WAN and everything in Step 5 since that’s where my VPN settings or the router go out to the modem and I suspect disabling the WAN Static IP would kill the Asus router and my VPN et al. Is that so..and is there a way to accomplish Step 5 and keep the WAN connections in place?
Thanks..and feel free to point me to somewhere else if this has already been address.
Hi Dan,
Excellent guide….. working on it as we speak. I do however have 1 challenge…… I am using a WAP (my WA801ND does not have any LAN ports, only WAN).
Could you let me know where to make what changes to make the WAN point act as LAN (and at what point in time if important).
Thanks in advance!
Henk
This seems like it’s exactly what I’m looking for.
I have a pfSense box built as my home router/firewall (192.168.0.1) and an R7000 as my WiFi AP (192.168.0.2). DHCP is coming from the pfSense box.
I also have a tenant downstairs who I give guest wifi access to. With the basic setup of my old router it was no problem. Now that I’ve decided to complicate things, this seems like it’ll do what I need it to do.
My concern though is that after configuring everything that you had laid out, if I go into Status/LAN and look at the DHCP Status its showing that the server is enabled, which it’s not and that the starting IP is 192.168.0.100 and its set to 10.100 in DHCPD.
Is this what it should look like?
Thank you for this excellent tutorial. I have a slightly different setup. I use an Apple Airport Extreme (older gen) as the distribution router (DHCP at my internet source modem, then have a Linksys WRT1900AC running a recent beta DD-WRT as an AP only on my main floor for signal strength reasons. I have a second DD-WRT router plugged into a LAN port on the Linksys for wifi VPN connections.
I would like to set up guest wifi on the Linksys, but I’m not sure if this approach will work since the Linksys is not actually the gateway (it’s IP is xxx.xxx.xxx.2 and my Apple AE is the xx… .1).
Do you have thoughts? I’ve tried various other setups from the DD-WRT forum and could not get it to work. Could connect to my guest but never got internet access. 🙁
Hoping you have an idea….
Thanks in advance
Just wanted to say thanks for posting this. Comprehensive and easy to follow.
Thank you I used this setup for 2 routers/AP and they worked perfectly. For the issue with the guest DNS DNSmasq originally mentioned by xyz3879. Problem can be solved by adding the following code in the DNSMasq Options:
# Set the DNS servers for br1 clients and OpenDNS (208.67.222.222) as alternative – can use another option if you like.
dhcp-option=br1,6,192.168.10.1,208.67.222.222
Thanks, it save me dozen hours of works.
Sorry if I over looked the answer to my question in your post, I am just a little burnt out trying to find the solution to my problem. A client wants guest browsing enabled on their router that is behind a firewall. The router is a Linksys ac1200 and is bridged thereby not allowing guest access. Will DD WRT allow me to configure guest access on this access point? Can I just set the guests up on the 2.4 standard and staff on 5 and call it good? Thanks in advance for the help!
Thank you thank you thank you! This worked perfectly on my rt-n16, I had been trying for a long time to get this to work, and had almost given up. Cheers!
Hi
I followed this setup but I can not make it work. the guest will get an IP address 192.168.10.101 or so) but can not go to internet.
So, my config is :
ISP router on 192.168.0.1
R7000 router on 192.168.0.2
still, I can not see internet.
any clues ?
thanks
I followed (even copy pasted all the codes) but I still don’t have internet connection for Guest Network 🙁
I am using 192.168.101.1 for the main and 192.168.102.1 for the guest. I tried to do it step by step to find where I lose the internet for the Guest Network and I lose it once I assign the Guest Network to its own Bridge (where I now have br0 and br1). Even after I have added the DHCPD (it now reads Interface br1: IP 192.168.102.1/255.255.255.0) and the said code in the DNSMasq (I did use 192.168.102.1) and in the Firewall Command Shell, I still cannot get internet connection.
Internet access is good when both the physical and virtual interfaces were under the same bridge (br0). After assigning br1 to the guest network, guest loses internet but the main is still okay.
I’m using Belkin F7D7301, dd-wrt.big.
codes used for…
DNSMasq:
# Enables DHCP on br1
interface=br1
# Set the default gateway for br1 clients
dhcp-option=br1,3,192.168.102.1
# Set the DHCP range and default lease time of 24 hours for br1 clients
dhcp-range=br1,192.168.102.100,192.168.102.150,255.255.255.0,24h
Firewall:
#Allow guest bridge access to Internet
iptables -I FORWARD -i br1 -m state –state NEW -j ACCEPT
iptables -I FORWARD -p tcp –tcp-flags SYN,RST SYN -j TCPMSS –clamp-mss-to-pmtu
#Block access between private and guest
iptables -I FORWARD -i br0 -o br1 -m state –state NEW -j DROP
iptables -I FORWARD -i br1 -d `nvram get lan_ipaddr`/`nvram get lan_netmask` -m state –state NEW -j DROP
#NAT to make Internet work
iptables -t nat -I POSTROUTING -o br0 -j SNAT –to `nvram get lan_ipaddr`
#Block torrent and p2p
iptables -I FORWARD -p tcp -s 192.168.102.0/24 -m connlimit –connlimit-above 50 -j DROP
iptables -I FORWARD -p ! tcp -s 192.168.102.0/24 -m connlimit –connlimit-above 25 -j DROP
#Block guest access to router services
iptables -I INPUT -i br1 -p tcp –dport telnet -j REJECT –reject-with tcp-reset
iptables -I INPUT -i br1 -p tcp –dport ssh -j REJECT –reject-with tcp-reset
iptables -I INPUT -i br1 -p tcp –dport www -j REJECT –reject-with tcp-reset
iptables -I INPUT -i br1 -p tcp –dport https -j REJECT –reject-with tcp-reset
Thanks for the article! Very well documented, very helpful. A couple notes that tripped me up on K3 dd-wrt build on my Asus RT-N66U.
In section 3, step 3, to “assign the IP address range for the new guest network”, the build in use (DD-WRT v3.0-r29134 big (02/19/16)) shows MAC addresses for the bridges. For the IP to ‘stick’, I had to change the MAC address for br1 to be different than br0, then the IP/Netmask saved.
There’s been some others in the comments that say they are not getting DNS when connected to the guest network. I was having this same issue. I realized in my wifi connection my private network gateway IP was being used for DNS which is blocked.
To fix this, in Step 3, “The final step for getting DHCP working”… I changed dhcp-option=br1,3,192.168.10.1 to be dhcp-option=br1,6,192.168.10.1 as @kk kumari had shown. Reconnecting my guest wifi then showed the proper DNS server IP.
Thanks again!
Thanks Trevor, changing dhcp-option=br1,3,192.168.10.1 to be dhcp-option=br1,6,192.168.10.1 did the trick for me!
Fantastic instructions! Thank you.
As many others have said, these were the only instructions that worked for me.
The only issue I am having is enabling security on guest AP. It works fine with no security, but as soon as I change to any (I have tried them all) security option, the client does not get connection or IP allocated.
The private network with security is working perfectly.
Any help would be appreciated.
I’ve read it before but did not find a solution. My guest network does not have internet. I did follow all the instructions and possible solutions but no luck sofar. Are there any solutions left?
Thanks, Mike
I followed the instructions and my guest wifi works and is isolated from my private network. However, guests are not isolated from each other on the guest network. I have enabled “AP Isolation” on the virtual wireless interface (wl0.1), but it does not work. Is there a firewall rule that can be manually added to isolate my guests from each other while they are on the guest network?
Huge thanks for these instructions!
This worked perfectly for me and I was on the brink of giving up after trying many other tutorials. Your screen shots were really helpful, they showed me where I had previously gone wrong.
Main Gateway router: Billion 7800N modem/router; guest AP: Netgear R6300 V1, using WAN port as the connection to the LAN. Guest access secured.
Thanks for your tutorial.
As some people, my guest network doesn’t have internet access.
My router is a TP-Link TL-WR841ND v11.
I need some help please.
After analysis, it works.
My gateway and dns settings was bad.
Despite they was bad, my private AP had internet access but not guest one.
My router is a TP-Link TL-WR841ND v11.
DD-WRT: v3.0-r29837 std (06/06/16)
Thank you so much for this!!
I was struggle but I get there in the end.
Two things:
1- On the router, I had to enable option: Configure the second IP Address and Subnet Mask for LAN interface with IP Address=192.168.1.10
2- I allowed guests to print by adding
iptables -I FORWARD -i br1 -d 192.168.1.5 -m state –state NEW -j DROP
iptables
Almost 5 years and many DD-WRT revisions later your instructions still worked beautifully with a little interpretation and tweaking of course – the substance and logic of the approach was still very clear. Tried directions from other sites but still couldn’t get the Guest SSID to connect to the Internet. Only you recognized and provided the script to deal with the firewall, and to disable the WLAN connection type. Great work. Thank-you very much.
How can I allow guests to print?
My printer on 192.168.0.99
I tried this line:
iptables -I FORWARD -i wl0.1 -o br0 -d 192.168.0.99 -m state –state NEW -j ACCEPT
and this line:
iptables -I FORWARD -i br1 -d 192.168.0.99 -m state –state NEW -j DROP
but none of these works.
what should I do, any idea?
Mill
Thanks for the excellent walkthrough. If I want the main private network to be able to access my guest hosts, not the other way round, what iptables command I should put into it?
Thanks a lot.
I feel tantalisingly close. Both private networks on 2.4GHz and 5GHz work without a problem.
The Guest network repeatedly tells me my password is incorrect. I have tried turning off security mode, but the SSID becomes invisible. And with changing the password and the WPA Algorithm same ‘Incorrect password for “ZigNET-Guest”’ error response each time.
Router Asus RT-N66U, Firmware: DD-WRT v3.0-r44715 big (11/03/20)
Thanks for this detailed guide. I feel tantalisingly close. Both private networks – 2.4GHz and 5GHz – work without a problem.
The Guest network repeatedly tells me my password is incorrect. I have tried turning off security mode, but the SSID becomes invisible. And with changing the password and the WPA Algorithm same ‘Incorrect password for “ZigNET-Guest”’ error response. Any ideas?