Pinball Machine: Post #1
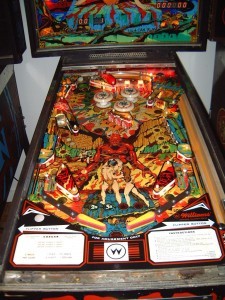
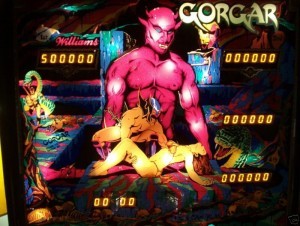
Well, my dad has recently become a pinball machine collector. In August, he bought his first machine, Riviera, and soon, he had acquired 4 more machines. Most recently, he acquired his first electronic pinball machine, Gorgar, by Williams, based in Chicago. Here is a brief description: released December of 1979, 14,000 units were made, it has a jungle theme to it, with a heartbeat sound in the background that speeds up as game-play intensifies. It looks to me like it will be a LOT of fun once we get it working properly.
The machine mostly works, the lights all flash, points are counted, the ball is served (one set of solenoids isn’t working right now, that bring up the GAR letter targets), however it doesn’t allow you to play more than one player (it is a four player game), and it doesn’t stop at 5 balls: you get infinite plays.
The machine was such a deal, he just jumped at it. Now, since electronics aren’t his trade (but is now mine), the machine has now become a project of mine. The first step is to go through, visually inspecting the boards, and make sure that all components are visually okay. So far, I’ve taken one board and checked the values of measurable components (resistors, capacitors), and replaced a few iffy looking ones, and made sure all the traces and contacts were made.
This board had a resistor that was burnt, however it still had the correct resistance across it. In the words of my professor, “It looks like someone took a blow torch to it!” I replaced that resistor, and verified the rest. My next step is to check the components on the two main boards. On Sunday, I cleaned the contacts on the battery holder (it takes three AAs) and made some minor repairs to it, so that we could put batteries in it again. This is to keep game modes in memory.
Previous resistor replacement.
One common problem with this machine was that owners would leave them sit for many years without changing the batteries, and they would leak and corrode the contacts. After some solder and terminal reconstruction, the OEM pack is working again, albeit a tight fit.
Note the three AA batteries on the top-left board. I reworked the battery socket. I like that big capacitor down at the bottom, right of center. I wonder what it’s rated at…
Because this board is from the 80s, it is to be expected that any de-soldering carries a high risk of damaging pads. As a result, for this resistor I had to use a small breadboard wire to act as a trace because the pad was missing for this resistor. After the repairs, I measured all the traces across the board to make sure contact was being made at the solder points.
This article is the first in a hopefully long series, anyone else interested in pinball machines, feel free to leave comments!
Note: All pictures of the actual machine, excluding those of the main display circuit board that I worked on, were obtained from http://ipdb.org/, the Internet Pinball Machine Database. I’ve not yet had a chance to take pictures of the actual machine, and we are unfortunately missing the back-glass, but photos will follow soon!


Coo’
That is awesome! Seemingly, you are becoming quite sensible and knowledgeable in the field of electronics. Keep up the excellent work.Good Luck.
Nice~ Now I wanna play Pinball
Thanks guys! Oh, blondie, click “Start – All Programs – Games – Pinball” (if you have Windows XP, anyway) 😛
I like that you talked about visually checking every board of the machine to see if they are in good condition. I will share this tip with my brother who plans to look for pinball machines for sale to display and use in his new home, since he has an entertainment room there. It will be best if he has a professional with him to check the internal aspects as well before investing in one that can cost quite an amount of money.